


NeuroDebian Virtual Machine
Installation | Working with the virtual machine | Troubleshooting | What has changed
We use NeuroDebian on a daily basis as it provides a stable and versioned software base for analysis. This is critical as it allows us to maintain data provenance, something that is often sorely lacking. Our collaborators who don’t quite have their heads around Linux yet are pointed to the NeuroDebian Virtual Machine, it allows them to run an identical analysis environment to us regardless of where they are or operating system.
—– [2013-02-06] Center for Advanced Imaging, University of Queensland, Australia
For all systems running a non-Debian-based operation system, such as MS Windows or Mac OS X, we offer a virtual machine that can be equipped with a large variety of neuroscience software with just a few mouse clicks (e.g. AFNI, FSL, PyMVPA).
The virtual machine contains an installation of Debian 8.0 (jessie) with a XFCE4 desktop environment. All installed software comes from standard Debian packages, or prospective Debian packages from NeuroDebian. The virtual machine can be seen as a showcase of what Debian for neuroscience research feels like. Once downloaded this virtual machine can be kept up to date, just as any other Debian installation. Using convenient graphical package management tools users will benefit from security bug fixes provided by the Debian project for the whole operating system, as well as from software updates for neuroscience-related packages.
Even on Debian-based systems this virtual machine is an excellent way to maintain an analysis environment that remains identical throughout the lifetime of a study and that can be archived alongside acquired data and publications. This is a much more practical way than freezing the entire software stack of a whole workstation, where it quickly becomes troublesome to combine the desire for latest research methodology for new studies and the need for stability for ongoing projects.
Installation
The following instructions demonstrate how to install the NeuroDebian virtual machine – here shown exemplary for Mac OS X, but the procedure is virtually identical on a Windows box. There is also a video tutorial at coffee break length. [Virtual machine setup video tutorial].
If you don’t have t already, first download and install a recent version of VirtualBox. VirtualBox is a virtualization software that is freely available for Windows, MacOS X, Solaris, and Linux. VirtualBox comes with a comprehensive manual that should answer potential questions regarding installation and maintenance.
Obtain the most recent version of the NeuroDebian virtual machine by visiting http://neuro.debian.net and selecting your operating system and a download server on the frontpage.
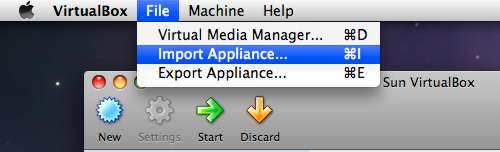
Start VirtualBox and select “Import Appliance” from the file menu.
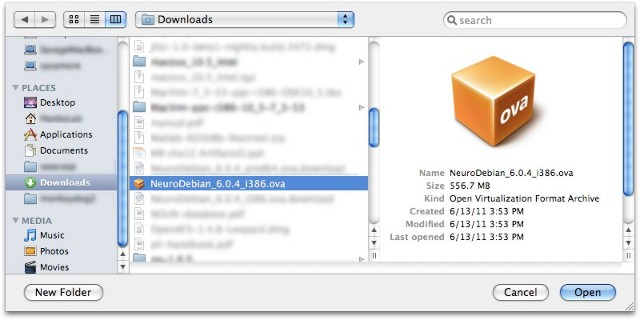
The next dialog will ask you to choose a virtual machine. Please navigate to the extracted NeuroDebian download and select the .ova (or extracted .ovf for older appliances shipped as .zip) file.
You can finish importing of NeuroDebian by clicking on next a couple of times. There is no need to change anything, as we will get through the settings in a second. Importing of the virtual machine will take a short while, as it is distributed in a compressed format that now gets extracted (total extracted size about 2 GB). Once imported, the NeuroDebian virtual machine will appear in the list of available machines. Do not start it yet, but select NeuroDebian and hit the Settings button. In the following dialog you’ll have a chance to configure the machine. You can assign the amount of RAM that should be made available to it (for serious fMRI data processing, please allow at least 2 GB). If you have a recent computer with multiple CPU cores, you can also decide how many cores should be used by the virtual machine.
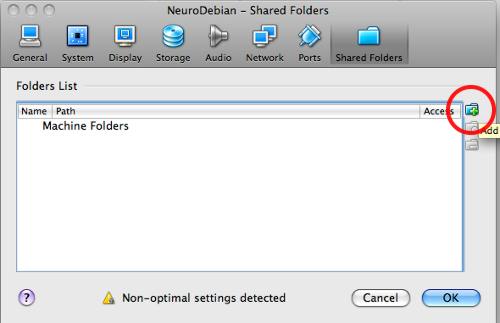
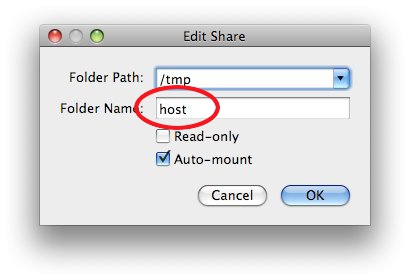
However, most important is the Shared Folders setup. Shared folders allow the virtual machine to access the local harddrive of the host computer. This is an easy way to access data on the computer without duplicating it or using the network to access it. The virtual machine is preconfigured to access a shared folder named labeled “host”. Click on the add button to select a folder that shall be accessible by the machine (e.g. your home directory) and put “host” as the folder name and mark it to be auto-mounted. Note, the folder name is simply a label. Your directory will not be renamed.
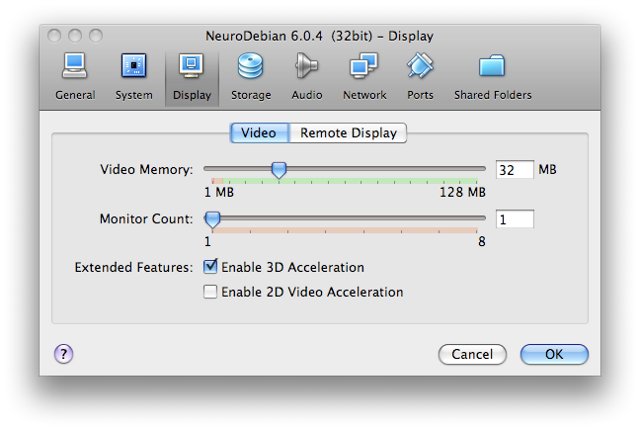
If you have a large screen you should increase the display memory to 32 MB in the Display settings. Also you might like to enable the support for 3D Acceleration
Finally, close the settings dialog. You have now completed the setup, and you can start the virtual machine by hitting the Start button. A new window will appear showing the boot process. After a short while the NeuroDebian desktop will appear, and a setup wizard will guide your through the final steps of the configuration. You can now explore the system. The virtual machine is connected with your host computer, and shares its Internet connection. Via this connection you can update the contained software packages at any time.

The virtual machine logs yourself in automatically. This is the default account:
- user:
brain
- password:
neurodebian
- root password:
neurodebian
In most cases you should not be forced to type the password, because sudo
is configured to work without it.
Note
For increased security you might want to change the default password. You can
do so by opening a terminal window and running the passwd command.
Working with the virtual machine
The NeuroDebian virtual machine has very low maintenance demands. We have prepared a short video demo that shows most typical procedures that you will probably perform while working with NeuroDebian inside a virtual machine: use the virtual machine in full-screen and seamless mode, shared folder access, software installation, as well as suspending and resuming the virtual machine. [Virtual machine handling video tutorial]
Troubleshooting
- Updating the VM or installing new packages doesn’t work
The VM uses as service that tries to figure out the best/closest package repository for you. In some network environments this service might not work well, or not at all. To check if this is a problem, you can modify the respective configuration by hand. Edit
/etc/apt/sources.list(you need to usesudofor that) and replace the package repository URL with a mirror close to you. A comprehensive list of mirrors is available at: http://www.debian.org/mirror/listPick one and replace all
geomirror.debian.netURLs with the new mirror URL. For example, in Canada you might want to change:deb http://i386-geomirror.debian.net/debian squeeze main non-free contrib
to:
deb http://ftp.ca.debian.org/debian/ squeeze main non-free contrib
Only modify lines that refer to
geomirror(all of them), but do not modify entries forsecurity.debian.org.- Our proxy setup at work prevents APT from downloading packages
APT needs to be told how to access the proxy. Talk to your local sysadmin and ask for the proxy’s address (maybe a username and password too), as well as the ports for HTTP and FTP proxies. With this information add the following lines in the file, /etc/apt/apt.conf.d/80proxy. This will ensure that after an upgrade changes won’t be lost:
Acquire::http::proxy "http://<username>:<password>@<proxy>:<port>/";
Acquire::ftp::proxy "ftp://<username>:<password>@<proxy>:<port>/";
Acquire::https::proxy "https://<username>:<password>@<proxy>:<port>/";
- I cannot hear sounds played in the virtual machine
By default the sound is muted. To enable playback launch the mixer applet by clicking on the mixer icon in the task bar. Unmute the master volume control. Now click on the “Volume control” to load the channel mixer dialog. Unmute the “Master” and “PCM” channels and raise the volume as desired. You should now be able to hear sounds played within the virtual machines through your host computer’s speakers.
- My VM lost mounted host directories after upgrading from VirtualBox from 3.x to 4.x
NeuroDebian VMs prior 6.0.3 were shipped with guest additions from 3.x series of VirtualBox and some initial versions of VirtualBox in 4.x series have failed to mount host directories properly. VirtualBox 4.0.8 seems to work fine with guest additions from 3.x series. If you nevertheless want to upgrade guest additions within NeuroDebian VM, please rebuild the version available from the backports:
sudo apt-get install -y linux-headers-2.6-`dpkg --print-architecture`
sudo apt-get install -y -t squeeze-backports virtualbox-ose-guest-dkms \
     virtualbox-ose-guest-utils  virtualbox-ose-guest-x11
and reboot VM.
- My VM lost mounted host directories, and display auto-resizing after upgrade
NeuroDebian VMs ship without Linux kernel headers pre-installed to minimize distribution/running footprint for one time throw-away usages of the VM. To install headers package(s) just run
sudo apt-get install -y linux-headers-dpkg –print-architecture
and reboot VM.
- I am still running an older VirtualBox 3.x
Download one of the image files listed below. These older releases are distributed as a zip file. Please extract all files from the .zip file, using appropriate software for your operating system.
NeuroDebian 6.0.2 image (32bit) [~545MB]
NeuroDebian 6.0.2 image (64bit) [~560MB]
What has changed
- 8.0.0 – 5 May 2015
- VM appliance based on the recently releaseed jessie 8.0.0.
It differs from wheezy appliance in not providing update-manager (became a heavy gnome-dependency) and not making neuro.debian.net a default home page in the browser. But otherwise – it got enriched with all wonderful additions of jessie, such as IPython 2.3.0 and others not readily available under wheezy.
- 7.8.0 – 2 Feb 2015
VM appliance based on the updated wheezy point release 7.8.0. Should resolve problems with upgrades of the guest additions.
- 7.4.20140423 – 24 Apr 2014
VM appliance based on the updated wheezy point release 7.4. Should resolve problems with upgrades of the guest additions. See http://neuro.debian.net/faq.html#comment-1351846812
- 7.4.0 – 28 Feb 2014
VM appliance based on the official wheezy point release 7.4.
- 7.2.0 – 03 Nov 2013
VM appliance based on the official wheezy point release 7.2.
Ships with updated neurodebian-* packages: - installs ipython notebook and qtconsole for “Scientific Python”
and “PyMVPA tutorial” welcome wizard choices.
- 7.0.0 – 15 May 2013
VM appliance based on the official wheezy release.
Uses xfce4-terminal by default (instead of urxvt/rxvt-unicode as in beta-releases)
- 6.999.b4.20130421 – 22 Apr 2013
Refreshed VM appliance to avoid lengthy initial upgrade
- 6.999.b4.20121231 – 31 Dec 2012
Based on beta 4 release of debian-installer for wheezy
- 6.0.6 – 01 Oct 2012
Updated core system to Debian squeeze 6.0.6
- 6.0.5 – 10 Nov 2011
Updated core system to Debian squeeze 6.0.3
Updated shipped virtualbox-ose guest-utils and guest-x11 to 4.0.10
~/hostis now symlinked to correct path/media/sf_hostbrainuser is added tovboxsfgroup so mounted host directories should become readily available
Root partition size and swap space got doubled in size (40GB and 2GB correspondingly). Space is allocated dynamically so the actual size of the virtual drive should not grow unless you use it
- 6.0.4 – 13 Jun 2011
Updated shipped virtualbox-ose guest-utils and guest-x11 to 4.0.4
- 6.0.3 – 12 Jun 2011 [Superseded in the archive by 6.0.4]
Updated to Squeeze 6.0.1
Updated VirtualBox guest additions to 4.0.4 from backports.debian.org
Appliance is available as a single file (.ova) ready for the import
- 6.0.2 – 08 Feb 2011
Minor update
- 6.0.1 – 01 Dec 2010
Minor update